

Turning Text into Talk on AWS: The Polly-Phonic Symphony of S3, Lambda and Amazon Polly


🎉 Dear readers, welcome to the grand orchestration of the digital age, where we'll take you on a captivating journey from the realm of text to the symphonic world of spoken words. In this technological masterpiece, we'll explore how the dynamic quartet of AWS S3, Lambda, and Amazon Polly 📦🔗🧬🗣️ comes together to turn mere text into audio. So, get ready to be dazzled as we unravel 'Turning Text into Talk on AWS: The Polly-Phonic Symphony of S3, Lambda, and Amazon Polly.' 🎶 It's a show you won't wish to miss! 🚀 Happy Learning !!
So Let's dive into the practical world now !!
Introduction
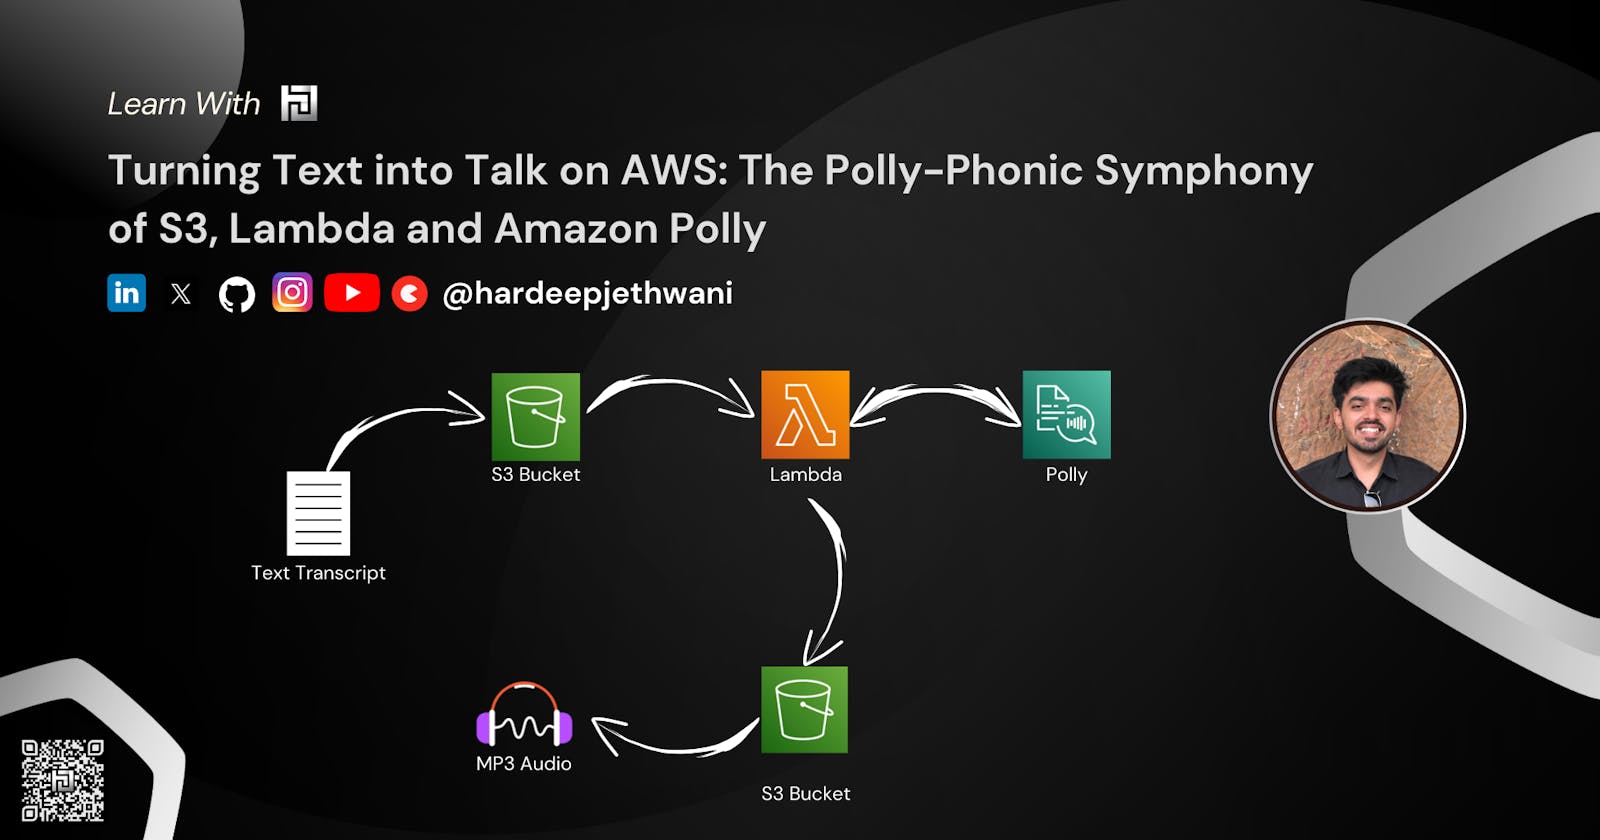
In this blog, we are going to design a workflow that will be able to convert the text file of any transcript and convert them into an Audio MP3 file automatically without any manual Intervention.
Functional Flow
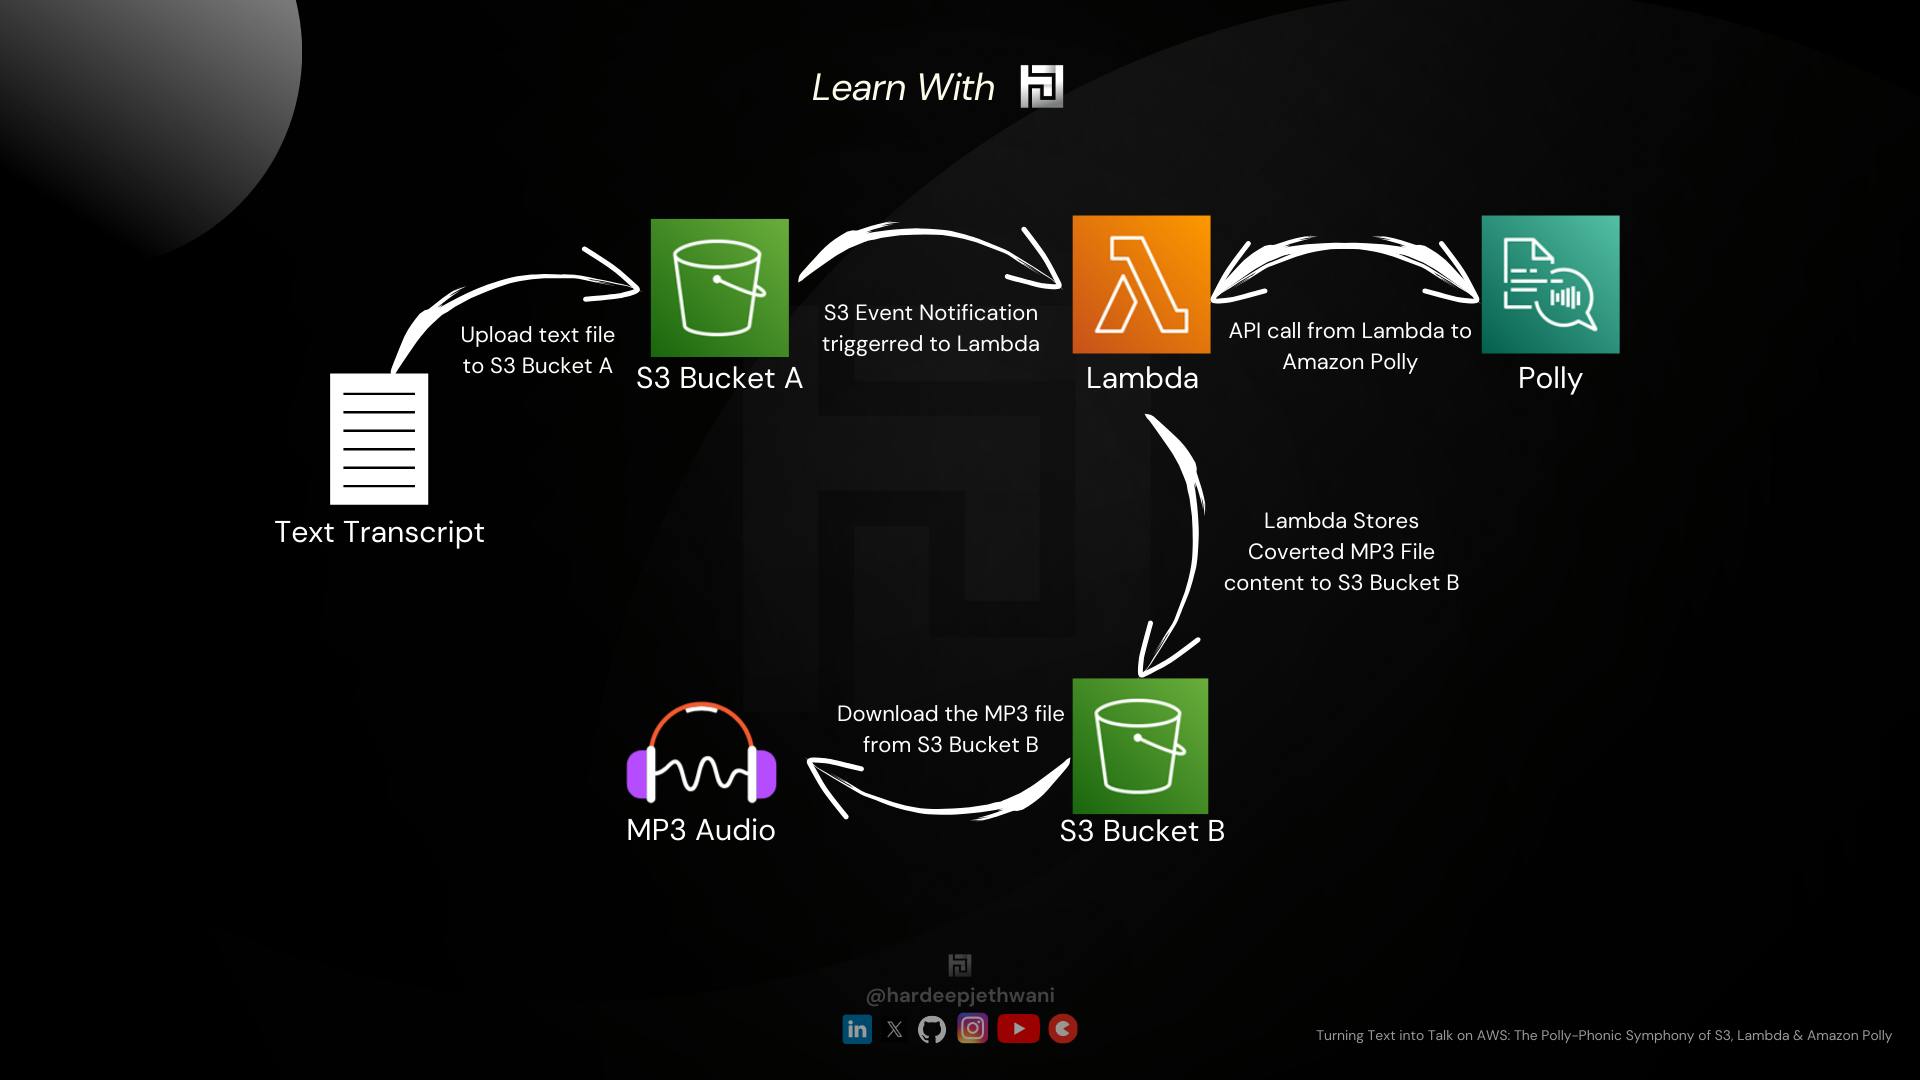
If you can see in the above workflow diagram, It explains how the file flows and you get the desired MP3 File. Below are the high-level steps of the workflow:
The file is uploaded to an S3 Bucket, Let's name it here as
text2talk-source-transcript-bucketS3 Event Notification is triggered which is configured for the bucket
text2talk-source-transcript-bucket.The Target of the S3 Event Notification is the Lambda function (let's name it as "text2talk" which we will use to convert the text transcript file uploaded to S3 bucket text2audio-source-transcript-bucket
The lambda function will fetch the text from the transcript file and send the content to Amazon Polly which will send back the data converted in form of an Audio file data.
The audio file will finally be uploaded to another S3 bucket. Let's name it here as
text2talk-target-audio-bucket.
Building the system
-> Creating the S3 Buckets
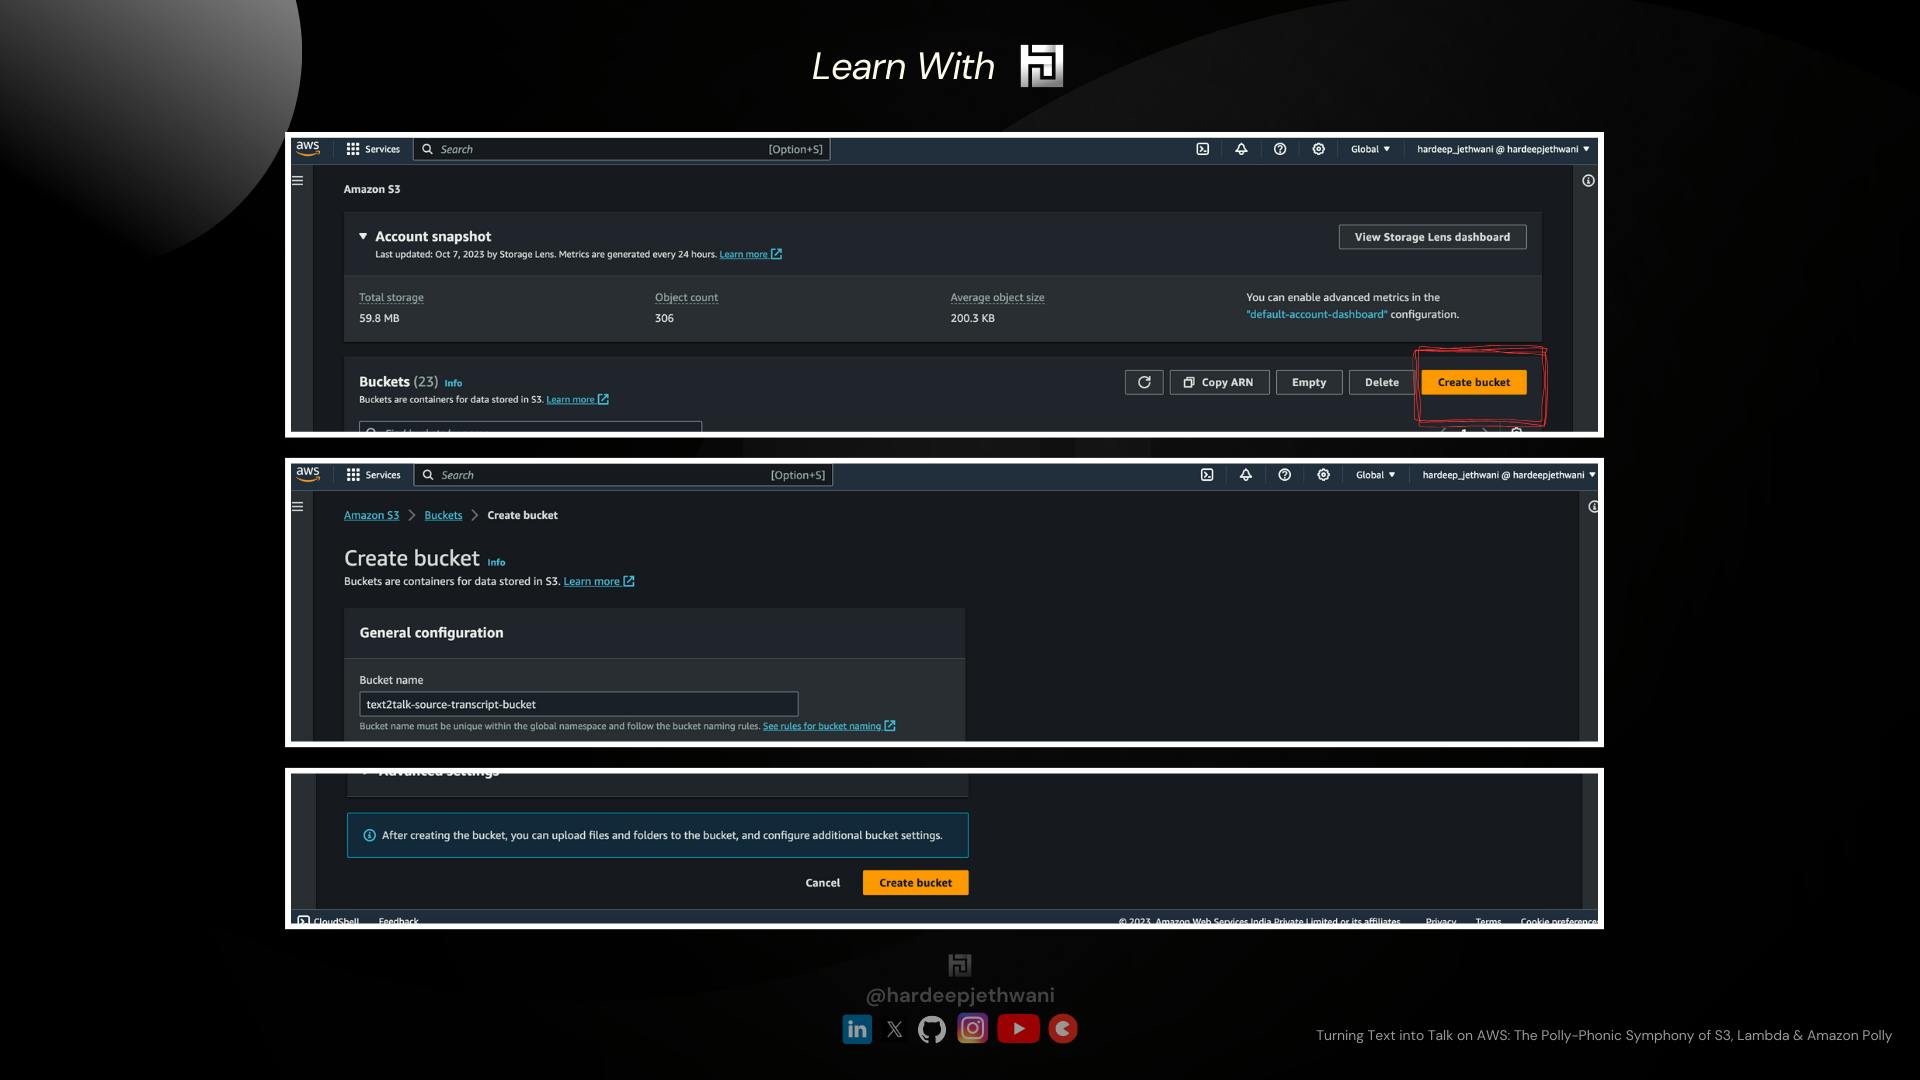
Login to the AWS console
Go to the S3 Service Dashboard and click on "Create bucket"
You will land on a page where you have to fill in the name of the S3 bucket as per your choice (here I have used
text2talk-source-transcript-bucketfor bucket to be used for transcript text files andtext2talk-target-audio-bucketfor bucket to be used export the Audio).
Important Note: S3 bucket names are to be kept globally unique. In case the name is not available then you can use another name accordinglyChoose the region according to your choice leaving the rest of the details as it is and click on "Create Button"
Follow the same steps for both of the source and target buckets and the buckets will be created which you can find on the S3 dashboard.
-> Setting up the Lambda Function
In our case, the lambda function will be accessing the S3 bucket to pull the transcript file and push the Audio file too !!
Also, the Lambda function will be making use of "Speech Synthesize" provided by Amazon Polly.
So In this case, Our Lambda Function should have the respective permissions to access the S3 bucket and Polly API calls !!
So we will create an IAM role first which is then to be assigned to the Lambda function later.
-> Creating IAM Role
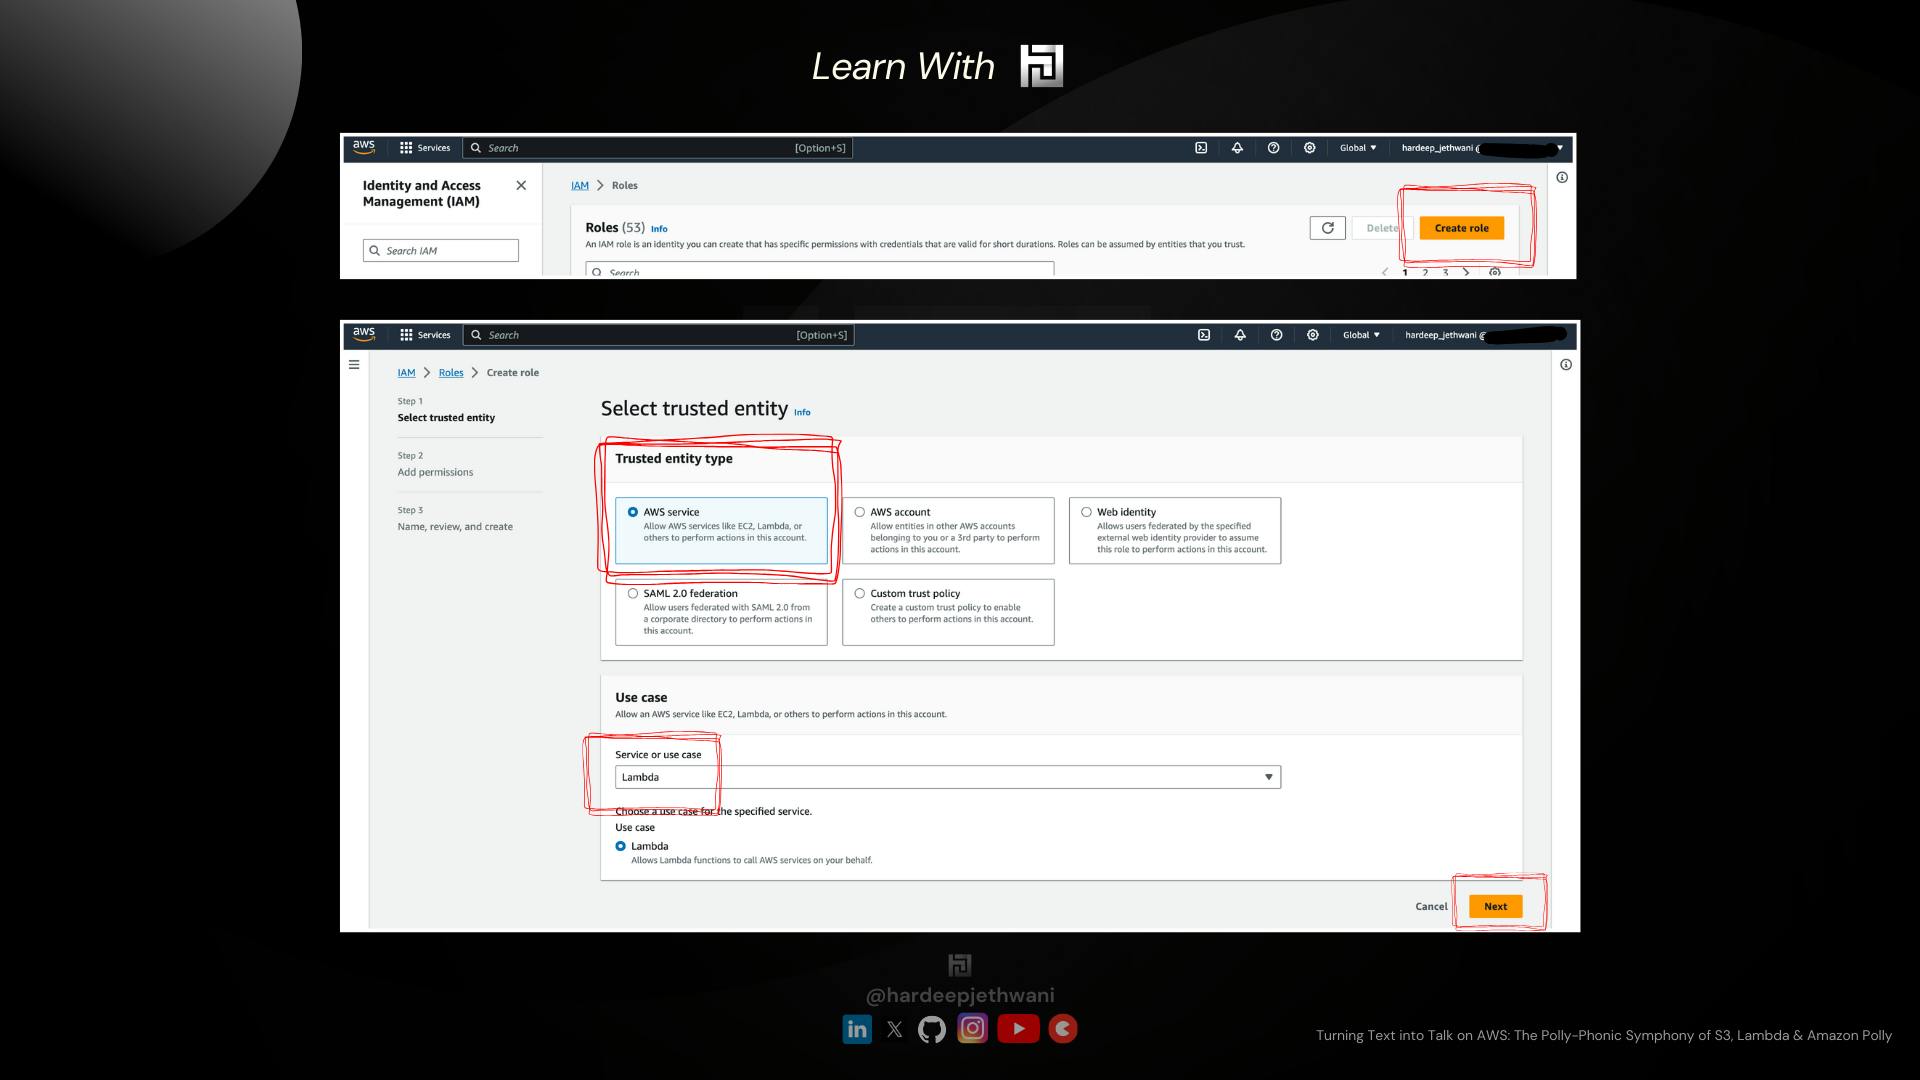
Jump on to the IAM Service and them in the Roles section for creating the role.
Click on Create Role.
You will land on the IAM Role creation page which shows 3 steps:
Selecting Trusted Identity: We are creating this role to be attached to a AWS Service i.e., Lambda here. So we will select "AWS Lambda" in trusted Entity Types. For the use case, we will select "Lambda".
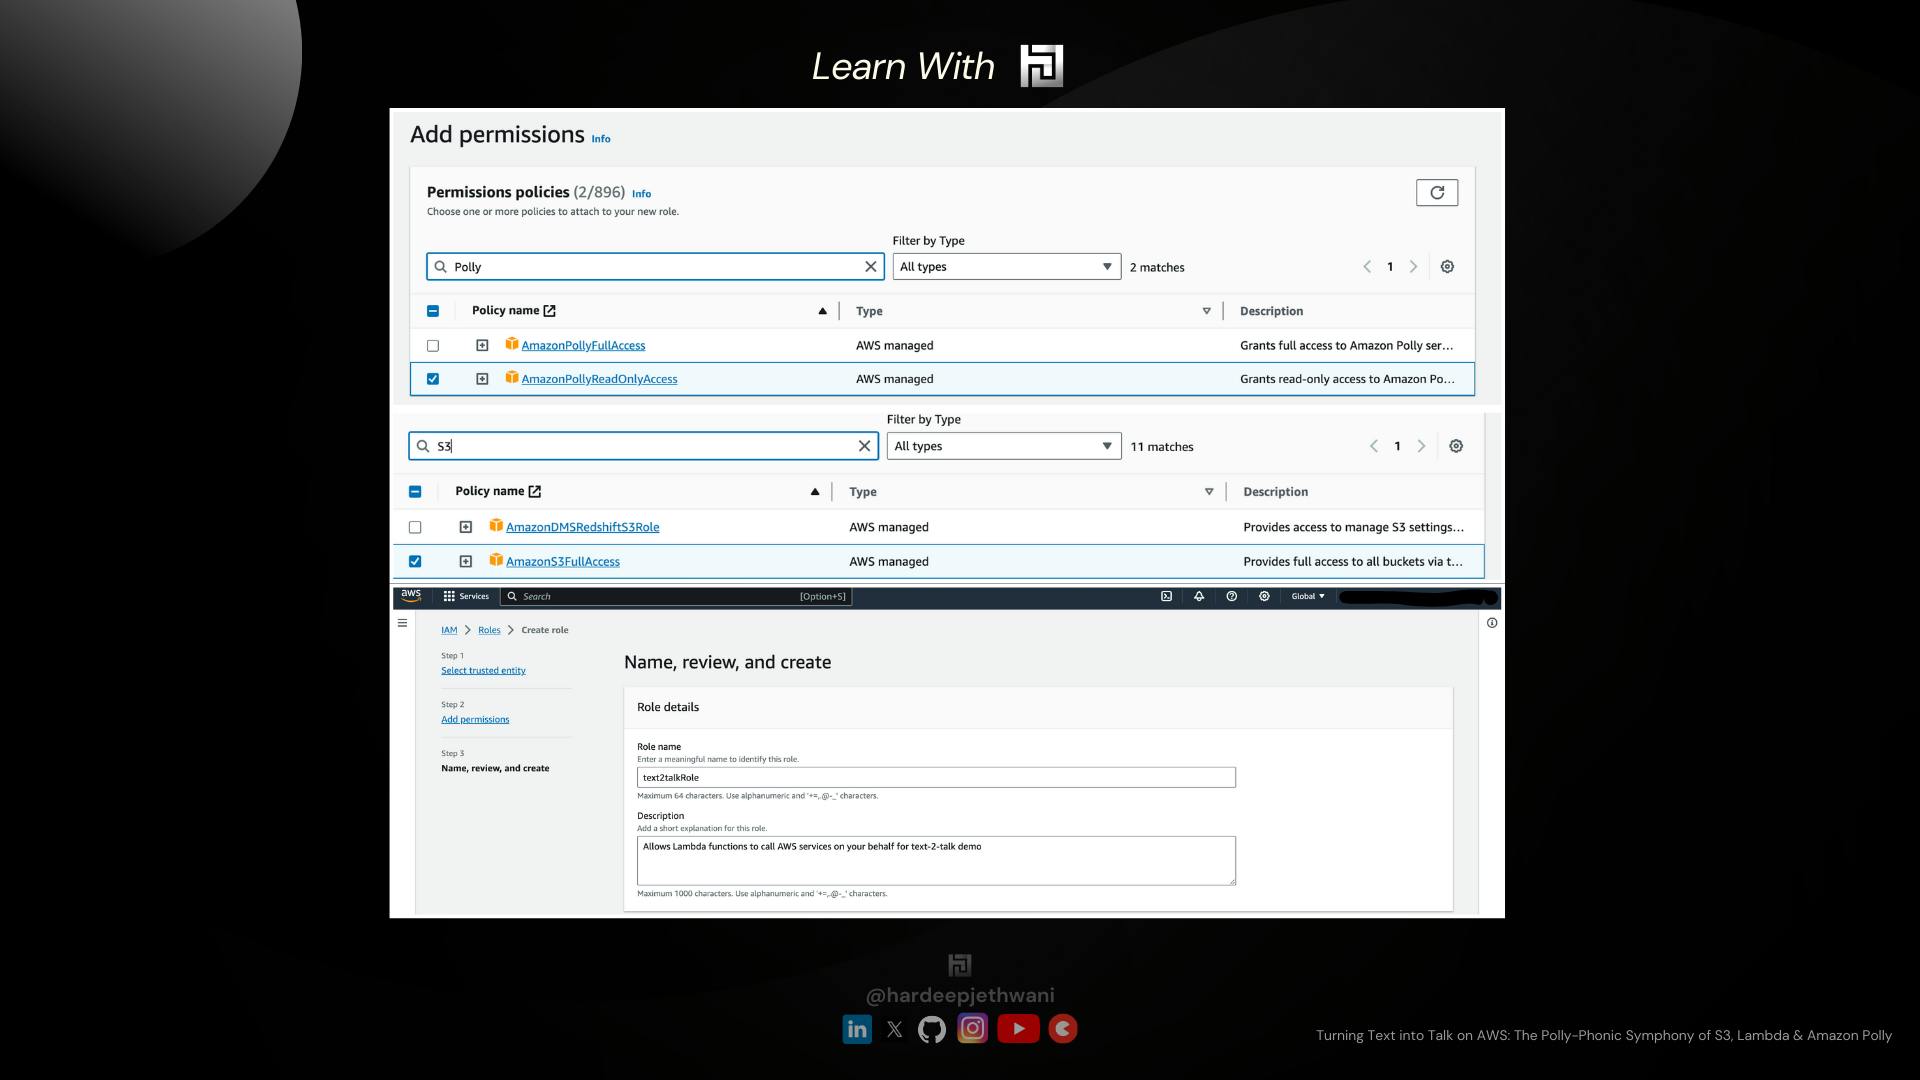
Add Permissions: We will add the AWS MAnaged Policies to our role named "AmazonPollyReadOnlyAccess" & "AmazonS3FullAccess" which will allow our Lambda to perform respective operations.
Name, Review & Create: In the Final stage you can add the name for your role (here text2talkRole). Review the permissions and create the role.
So now that we have created the IAM Role as per our needs we will jump on creating our Lambda function finally.
-> Creating the Lambda Function
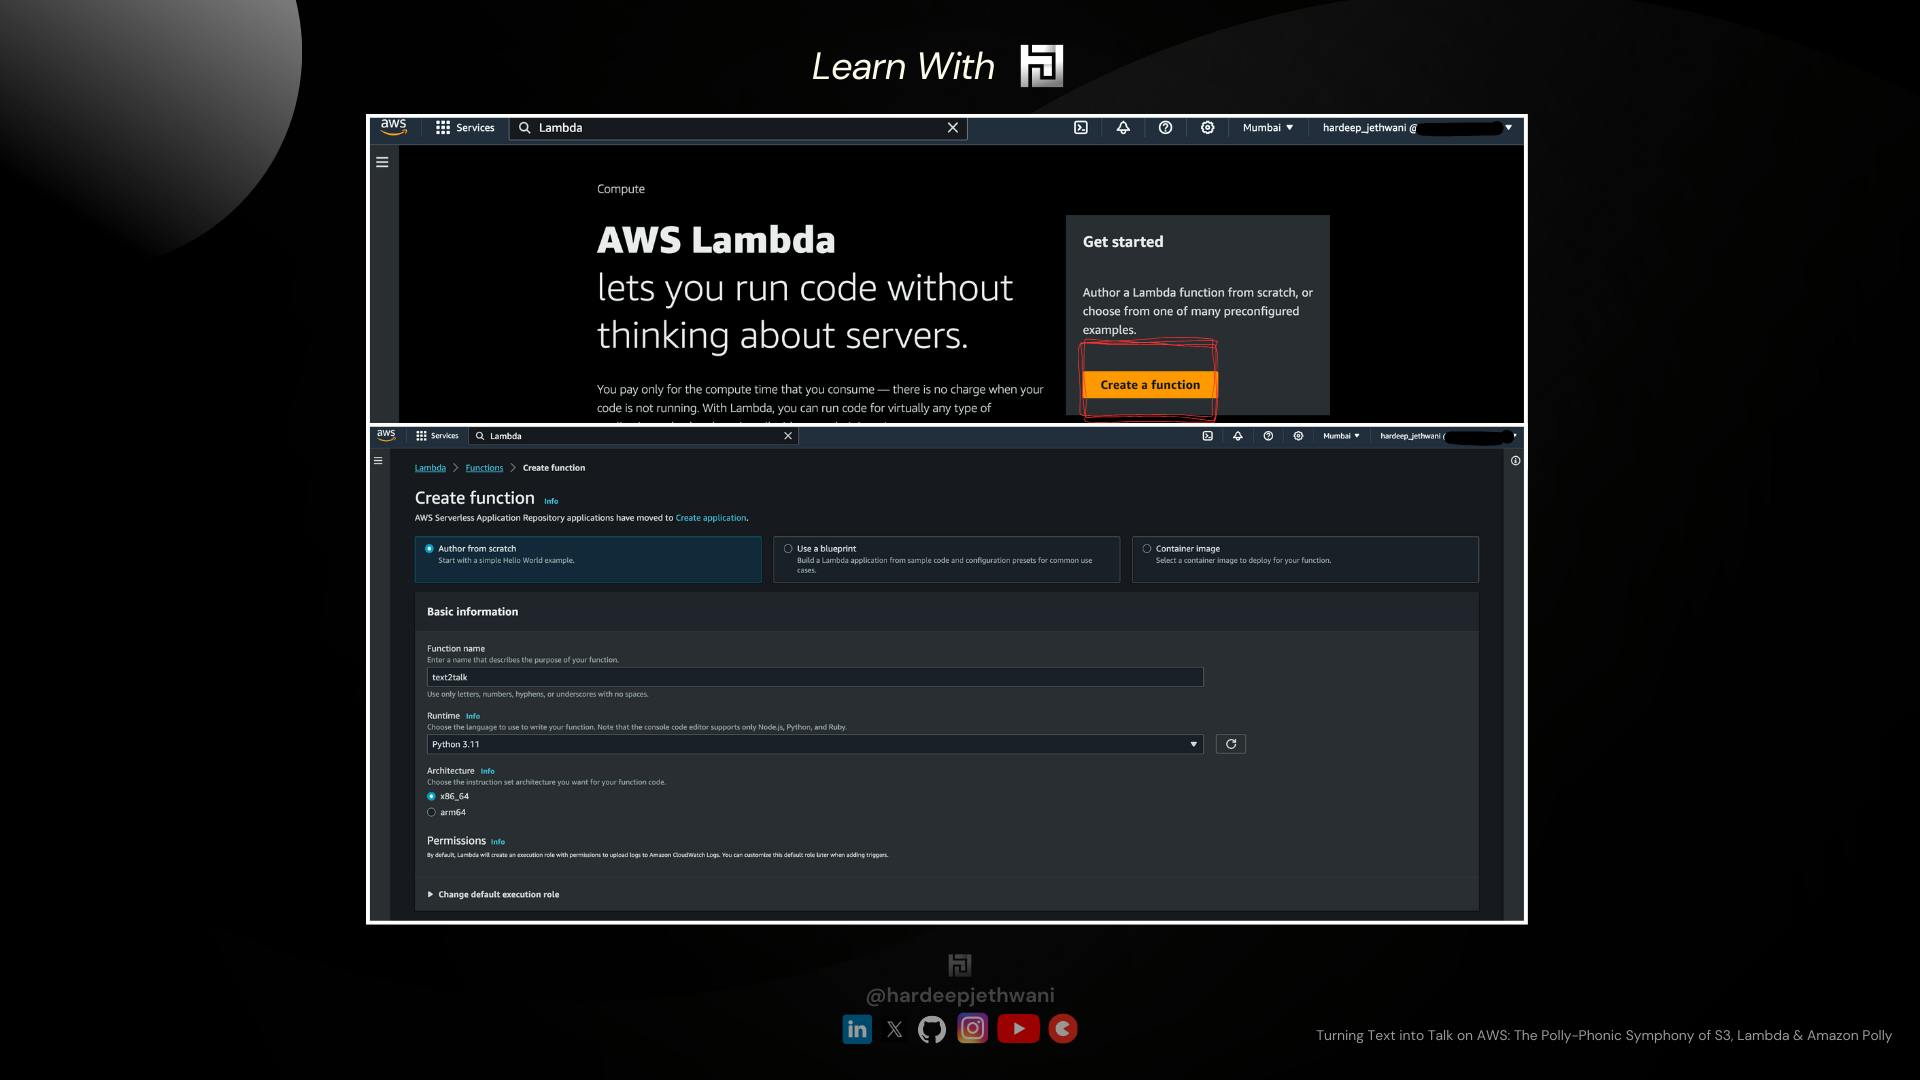
Go to the AWS Lambda Service in AWS Console
Click on "Create a function" button. You will land to the Lambda creation page.
Select the following options:
Author from Scratch as we are going to write our lambda function code
Name as text2talk
Select Python 3.11 as the lambda runtime (You can make us of any other runtime too but the code changes will be needed accordingly)
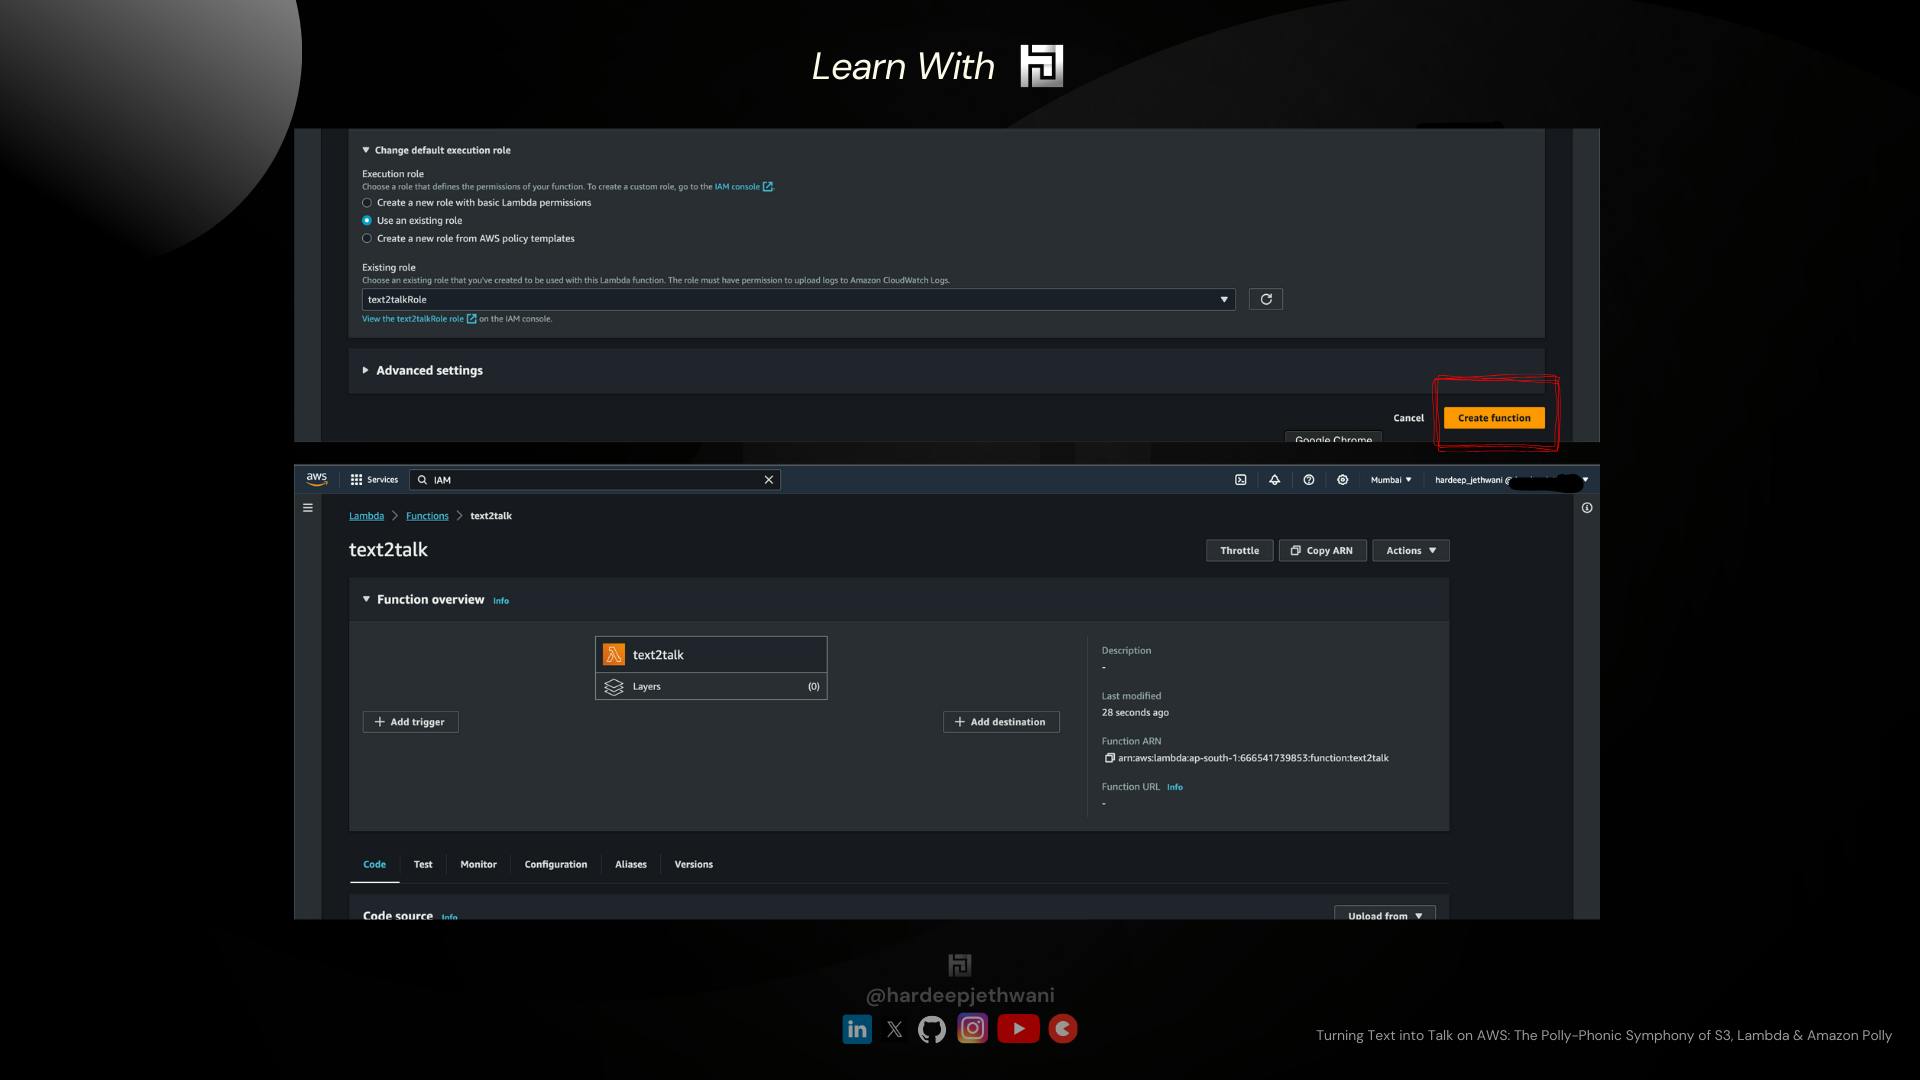
Expand "Change default execution role" Select "Use an existing Role" & then choose the IAM role that we created.
Click on "Create Function" and your raw Lamda function will be created.
Wait guys, the job is not yet done, the actual thrill is below !!!
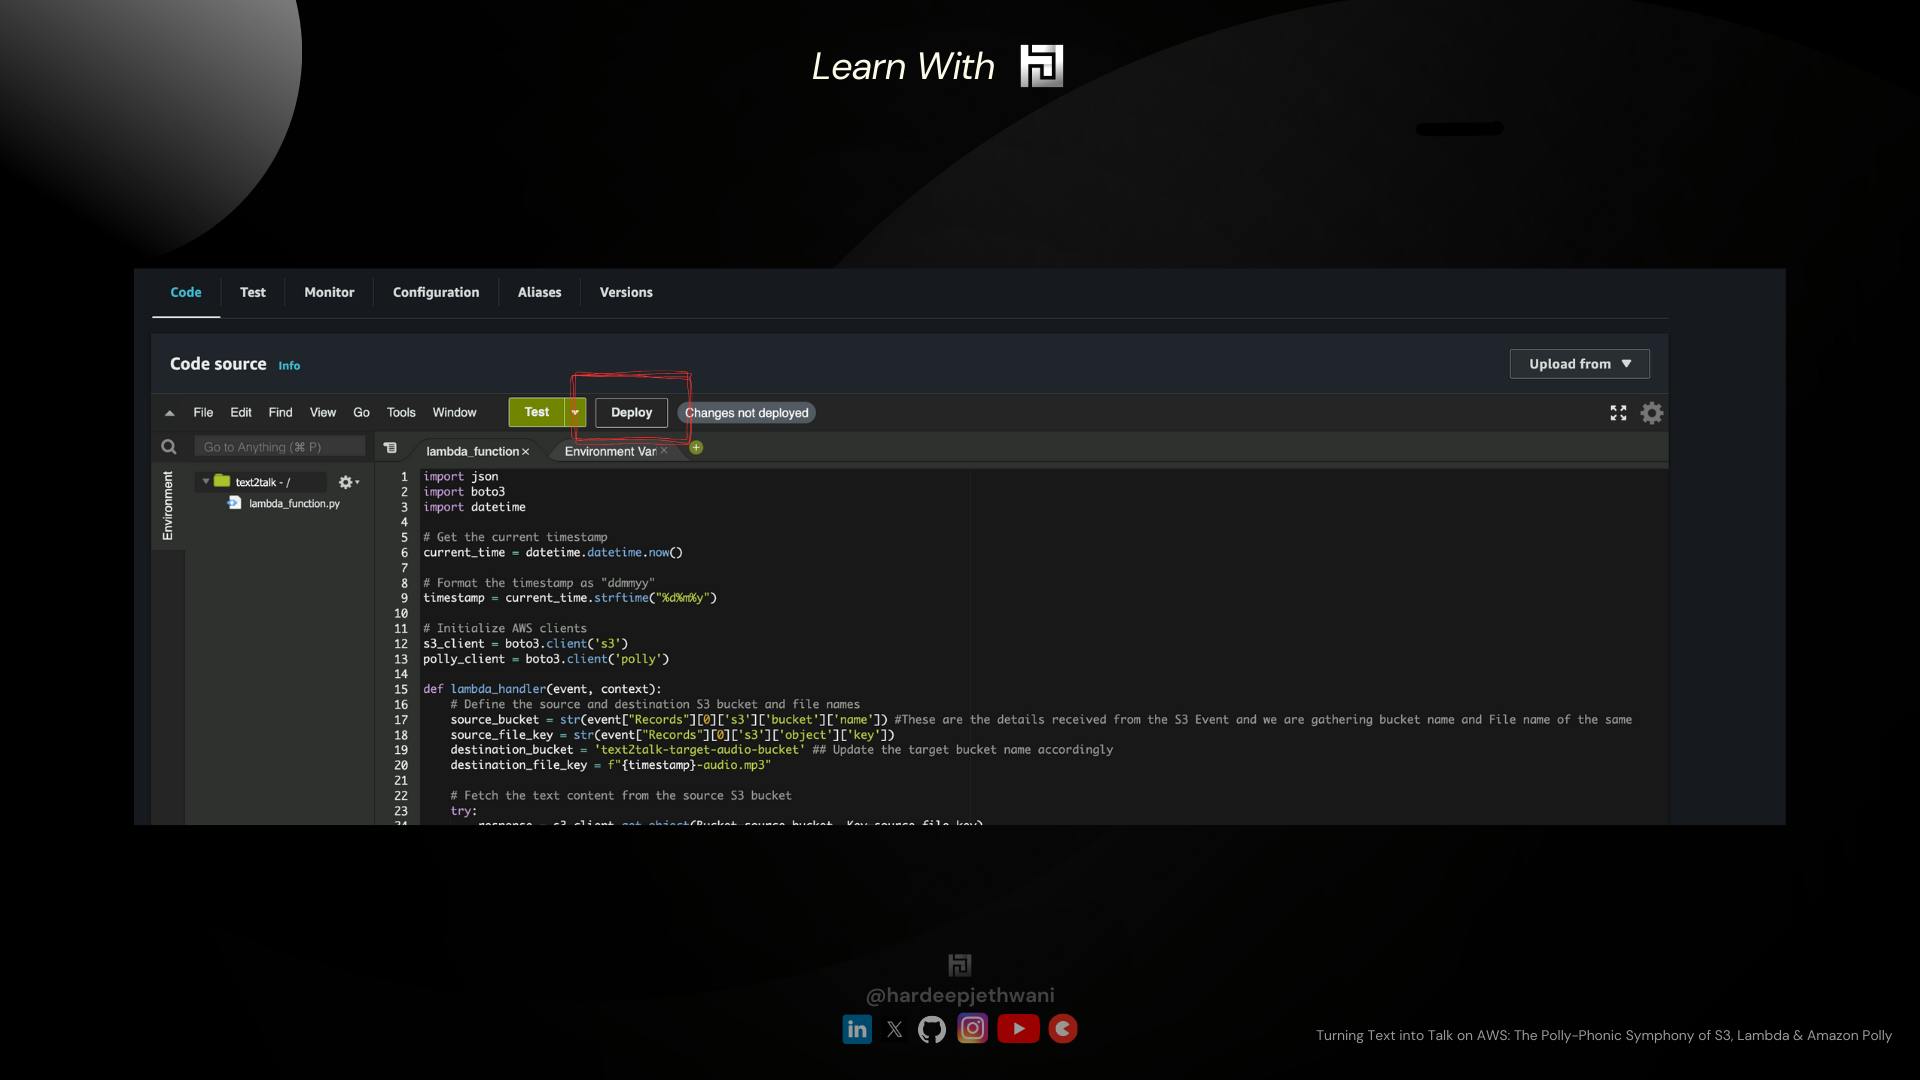
We have to make use of the Python code below paste it down in our Lambda console and Click on Deploy.
So this lambda function written in Python creates an
S3 clientby making use ofboto3library. And then the S3 client is used for Pulling the file from our source S3 bucket.IMPORTANT: There is no need to hardcode the name of the Source S3 bucket here because, later on, we are going to configure the S3 Event Notification, which is then going to trigger the Lambda function. So the Event object will have all the details of the Bucket and Object that was uploaded to S3.
However, we need to hardcode the target bucket name (Update the bucket name as per the name that you have used).
This Python function also creates a client object for operating with polly (
polly_client). We are making use ofsynthesize_speechcall for Polly where we are passing the audio format, text format and the Voice ID ParametersWe have passed the Voice ID parameter as "Salli" but you can play around with different voices and refer to Amazon Polly Voice List Blog.
AWS Lambda Python Code
import json
import boto3
import datetime

# Get the current timestamp
current_time = datetime.datetime.now()

# Format the timestamp as "ddmmyy"
timestamp = current_time.strftime("%d%m%y")

# Initialize AWS clients
s3_client = boto3.client('s3')
polly_client = boto3.client('polly')

def lambda_handler(event, context):
    # Define the source and destination S3 bucket and file names
    source_bucket = str(event["Records"][0]['s3']['bucket']['name']) #These are the details received from the S3 Event and we are gathering bucket name and File name of the same
    source_file_key = str(event["Records"][0]['s3']['object']['key'])
    destination_bucket = 'text2talk-target-audio-bucket' ## Update the target bucket name accordingly as per bucket name in your account
    destination_file_key = f"{timestamp}-audio.mp3"

    # Fetch the text content from the source S3 bucket
    try:
        response = s3_client.get_object(Bucket=source_bucket, Key=source_file_key)
        text = response['Body'].read().decode('utf-8')
    except Exception as e:
        print(str(e))
        return {
            'statusCode': 500,
            'body': f'Error fetching text from S3: {str(e)}'
        }

    # Use Amazon Polly to synthesize speech from the text
    try:
        response = polly_client.synthesize_speech(
            OutputFormat='mp3',
            Text=text,
            VoiceId='Salli'  # You can choose a different voice IDs too
        )
        audio_data = response['AudioStream'].read()
    except Exception as e:
        print(str(e))
        return {
            'statusCode': 500,
            'body': f'Error synthesizing speech with Polly: {str(e)}'
        }

    # Upload the MP3 audio to the destination S3 bucket
    try:
        s3_client.put_object(Bucket=destination_bucket, Key=destination_file_key, Body=audio_data)
    except Exception as e:
        print(str(e))
        return {
            'statusCode': 500,
            'body': f'Error uploading MP3 to S3: {str(e)}'
        }
    print("success")

    return {
        'statusCode': 200,
        'body': f'Successfully converted and saved text to MP3: s3://{destination_bucket}/{destination_file_key}'
    }
You have to copy the above code and paste it to the Lambda console and then click on Deploy!!
So now what, We have our Lambda function ready !!
Now we will move to our final step !! i.e, configuring S3 Event Notification on our source S3 bucket !!
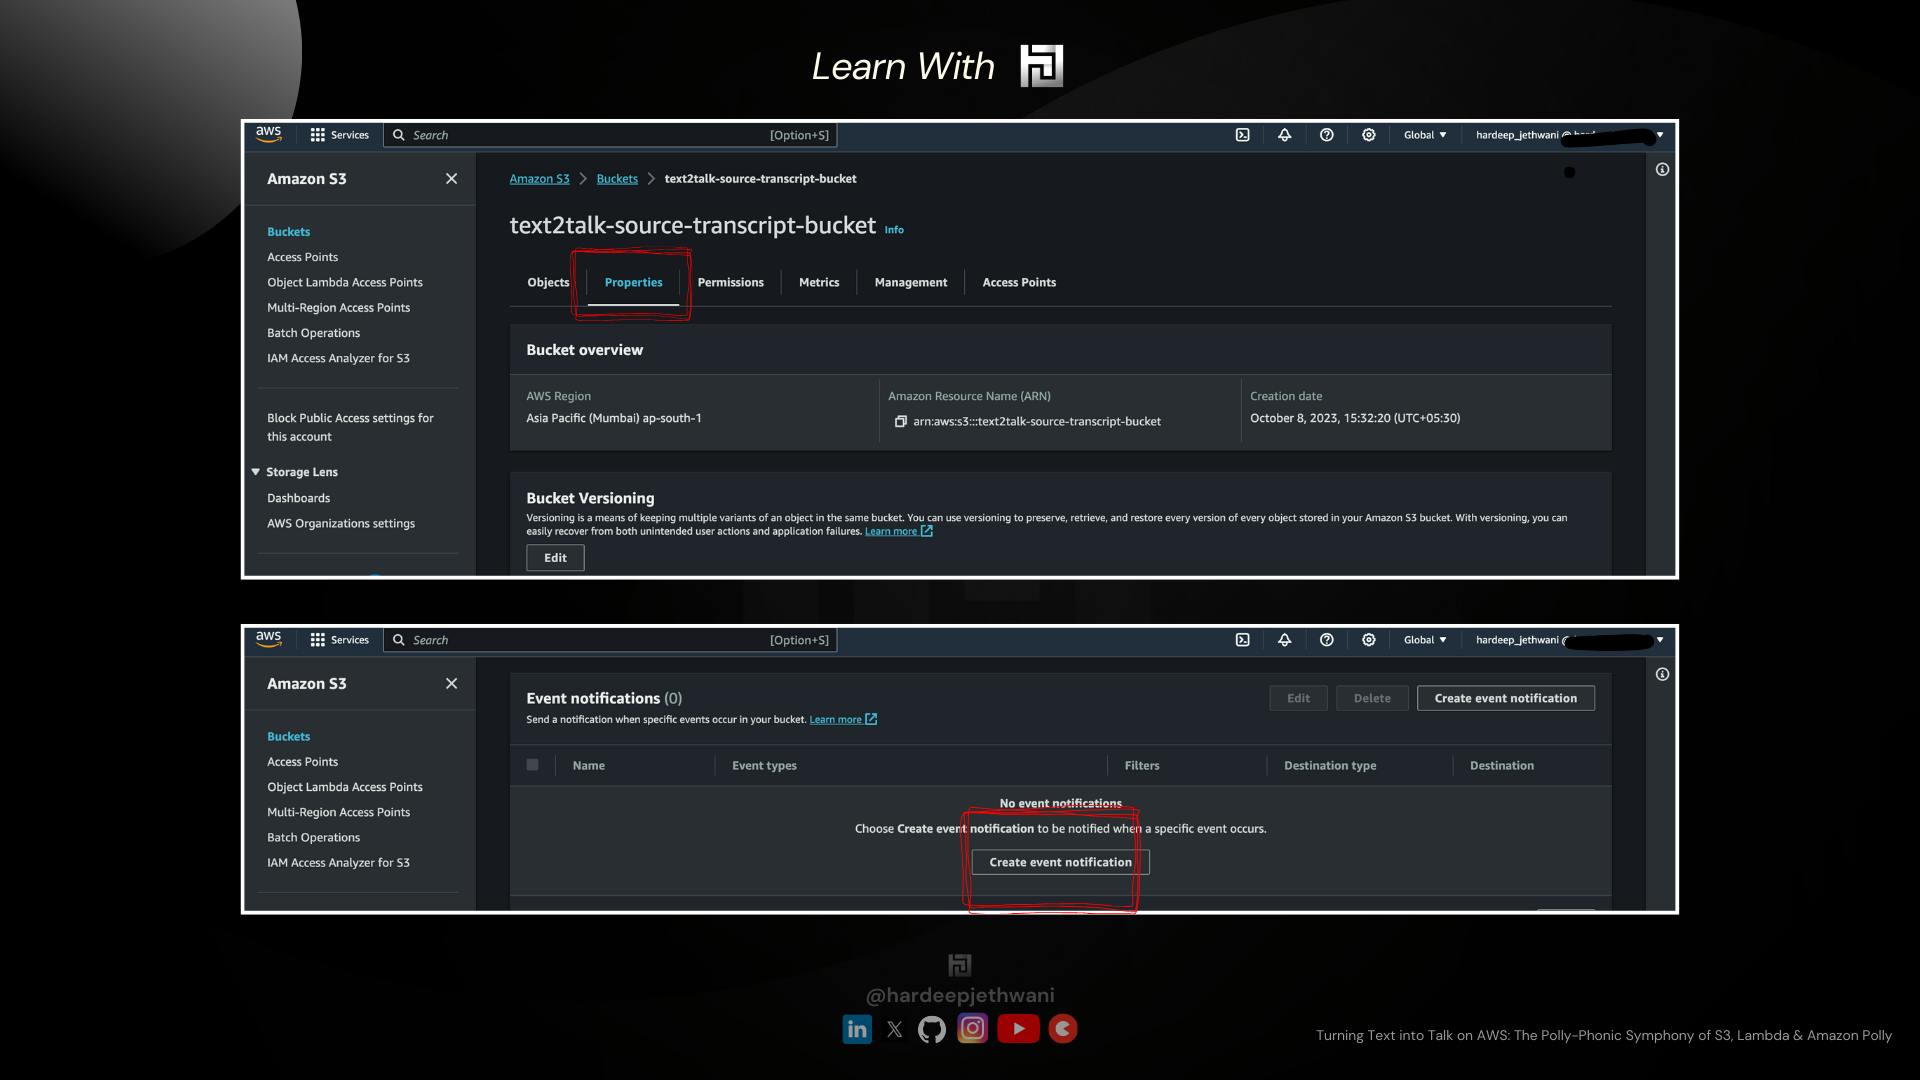
-> Configuring S3 Event Notification
Go to AWS S3 Console
Click on your bucket (here
text2talk-source-transcript-bucket). And then go to "Properties" section of the same.On Scrolling down, you will find the section for "Event Notification". You have to click on "Create Event Notification"
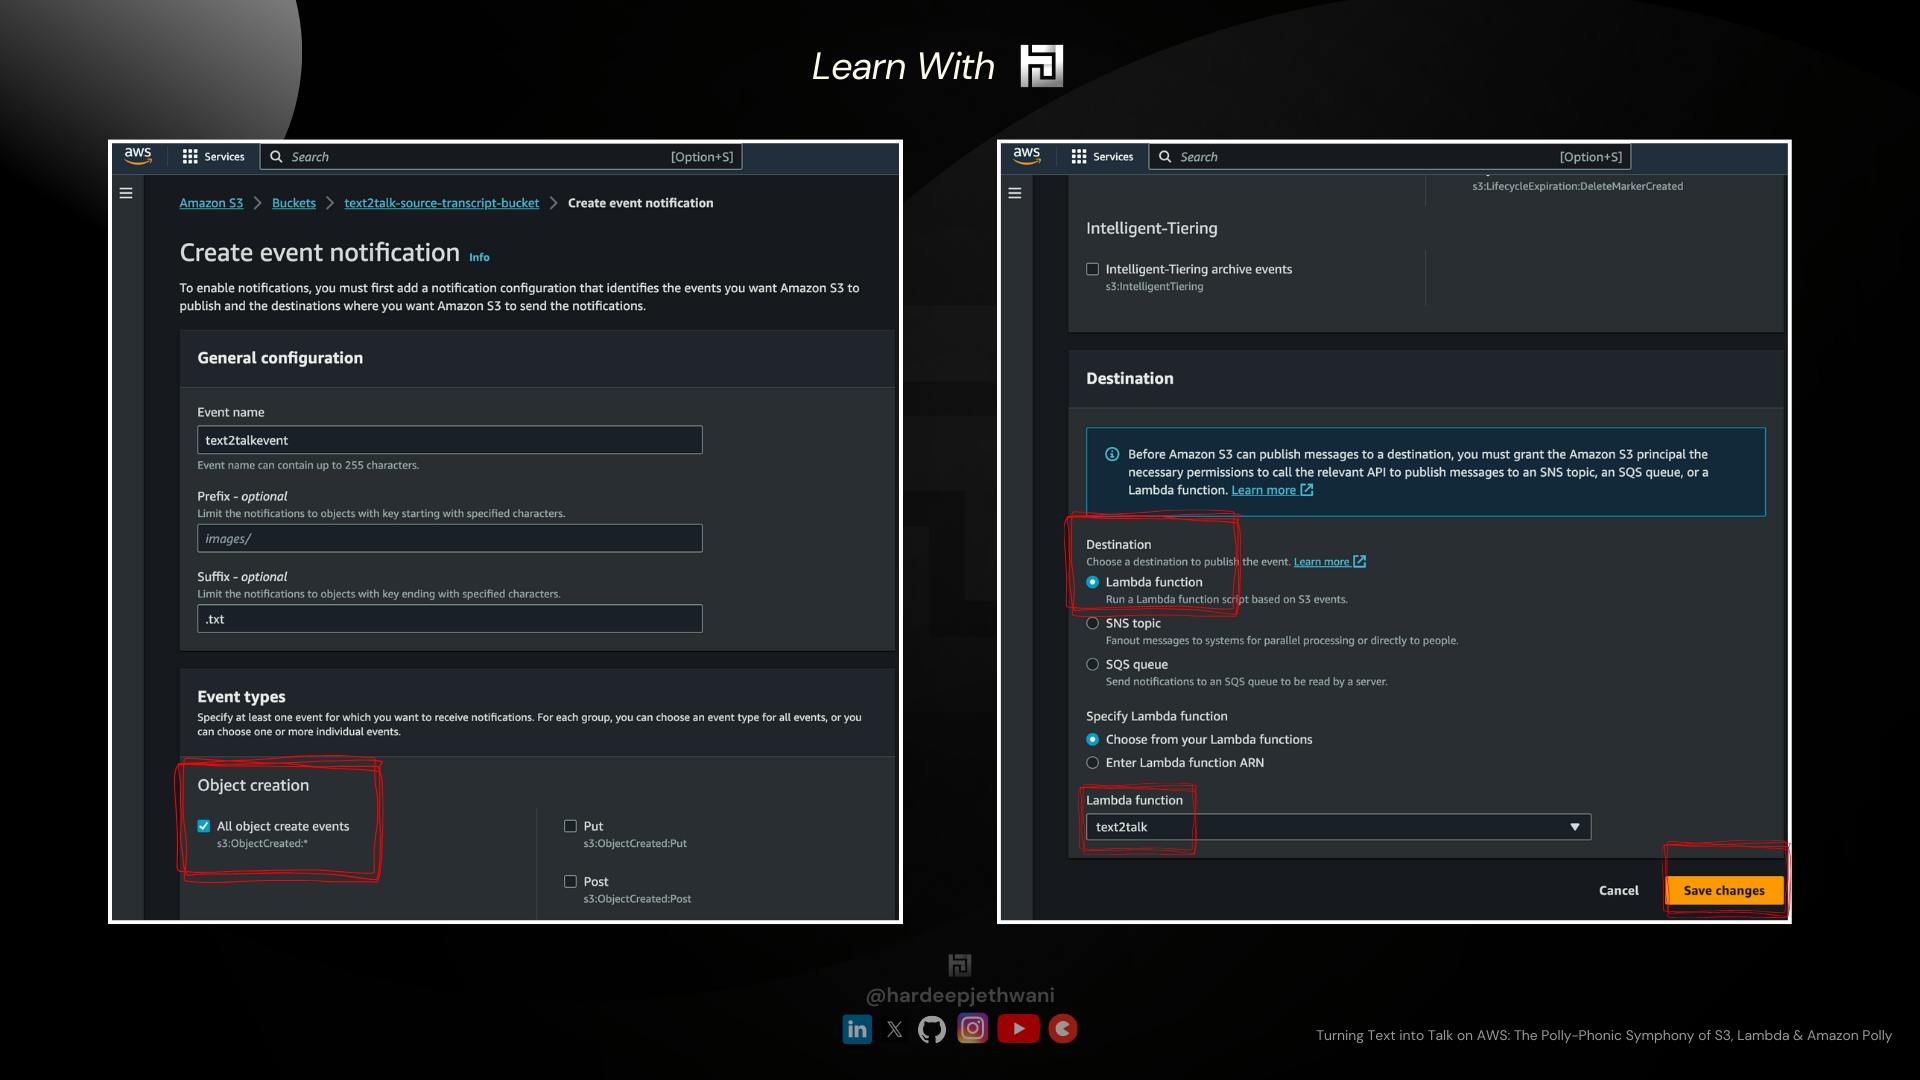
You will land on a page to fill in the details for S3 Event trigger action and the target.
You can name your event and then select the format of the file that we want to trigger our Audio Conversion action on. So here we are using ".txt" as the source file format.
In the Event Types, Just check on the "All Object Creation Events", as we have to trigger this conversion on every file creation/updation event
Scroll down to the bottom to fill in the Destination details !! In our case it is a lambda function named "text2talk" (You can also choose to fill the ARN of the lambda function)
And then Just click on the save changes.
Woohoooo we have finally completed the Build phase !!! Now it is the time to test our design....
Testing the setup !!!!
You have to just upload a test file in the source bucket (here
text2talk-source-transcript-bucket)(I have made sample text which you can find HERE on GitHub !!Then in a few seconds, you can check your target bucket (here ) Andddddd you will finally see an Audio file over there !! (You can find my results HERE on GitHub)
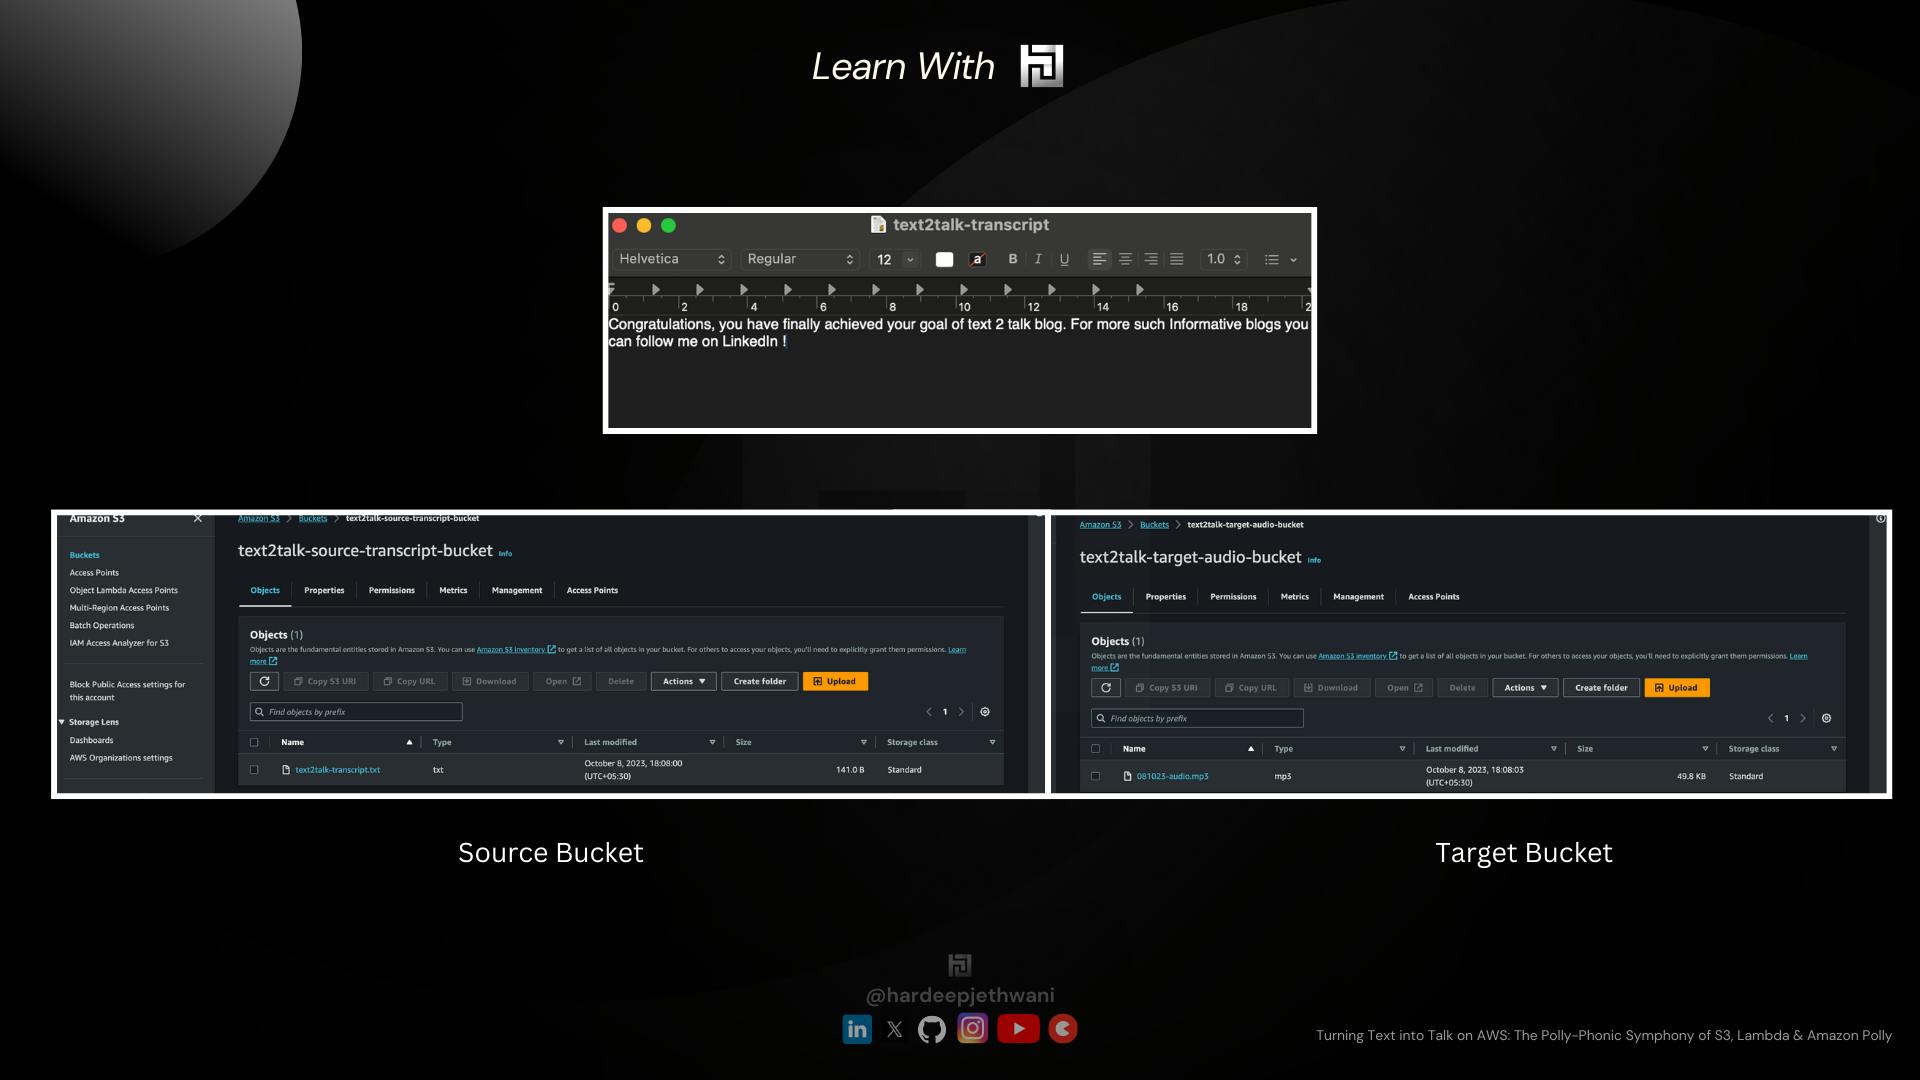
So Finally we were able to make it up !!! Congratulations !!!
Thank you for joining me on this Polly-Phonic conversion journey, where reality is stranger than fiction, and the only drama involves coding conundrums. Happy cloud building, and may your infrastructure always stay drama-free! ☁️😄🏰
Do you have more burning questions or just need a daily dose of cloud-related humor? Follow me on social media, where I promise to share cloud wisdom with a side of chuckles:
LinkedIn: Connect with me on LinkedIn, where my cloud prowess is only rivalled by my talent for finding the perfect GIF for every situation. 🚀💼 hardeepjethwani@LinkedIn
TopMate: Looking for a fellow cloud aficionado to share a virtual coffee with or brainstorm your next AWS masterpiece? Find me on TopMate! Because let's face it, cloud enthusiasts need to stick together. ☕🤝 hardeepjethwani@topmate
Instagram: For behind-the-scenes glimpses of my cloud adventures and occasional 'AWS Gone Wild' stories that even AWS engineers find amusing. 📸🌩️ hardeepjethwani@Instagram
X: Join the cloud conversation on Twitter, where I drop cloud knowledge and quirky cloud memes faster than you can say 'Elastic Beanstalk.' 🐦☁️ hardeepjethwani@X
So, whether you're seeking cloud advice, a good laugh, or simply a friendly chat about cloud formations and coffee preferences, I'm just a click away on these cloud-tastic platforms. See you in the cloudisphere, fellow cloud builders!" 🌍☁️😄
Want to support my cloud adventures and keep the coffee flowing? Feel free to buy me a virtual coffee. After all, coffee is the secret sauce behind every successful cloud deployment. ☕🙌